Hey there, fellow One Piece enthusiast! If you've ever found yourself itching to bring Monkey D. Luffy to life on paper, you're in the right place. Luffy drawing isn't just about sketching a pirate; it's about capturing the essence of adventure, friendship, and dreams. Whether you're a beginner or a seasoned artist, this guide will help you master the art of drawing everyone's favorite rubber man. So, grab your pencil and let's dive into the world of pirates and art!
There’s something magical about Luffy that makes him an iconic character. His journey from a naive rubber boy to the Pirate King inspires millions of fans worldwide. And what better way to celebrate his legacy than by learning how to draw him? This guide will walk you through every step, from understanding his anatomy to adding those signature details that make Luffy, well, Luffy.
But before we get our hands dirty (or rather, our pencils smudged), let’s talk about why drawing Luffy is more than just a hobby. It’s a way to connect with the story, the characters, and the dreams that One Piece represents. So, buckle up, because this is going to be one heck of a ride!
Read also:Museum Of Illusions Promo Code Unlock Discounts And Unleash Your Curiosity
Why Luffy Drawing is a Must-Try
Let’s face it—Luffy is more than just a character; he’s a symbol of resilience, determination, and fun. Drawing him isn’t just about replicating his appearance; it’s about channeling his spirit into your art. Whether you’re a fan of anime or simply someone who loves doodling, learning how to draw Luffy can open up a whole new world of creativity. Plus, it’s a great way to impress your friends and fellow fans!
What Makes Luffy Unique in Art
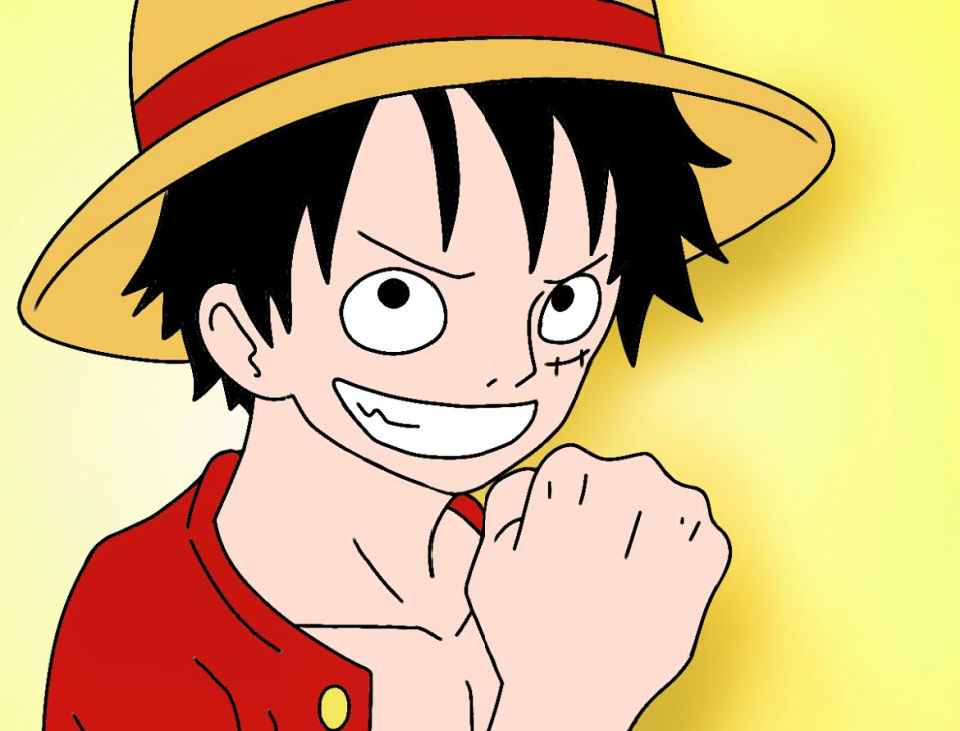
Luffy’s design is both simple and complex, making him an excellent subject for artists of all levels. His exaggerated features, like his oversized mouth and stretched limbs, add a playful element to any drawing. But don’t let that fool you—getting his proportions right can be tricky. That’s why we’ll break down his anatomy step by step, so you can nail those iconic details every time.
Basic Anatomy of Luffy
Before we jump into the nitty-gritty of drawing Luffy, let’s talk about his anatomy. Understanding the structure of his body is crucial for creating a realistic and dynamic drawing. Luffy’s design is heavily influenced by manga conventions, so we’ll focus on exaggerating certain features while maintaining balance.
- Head Shape: Luffy’s head is slightly rounder than most characters, with a prominent jawline.
- Eyes: His eyes are small but expressive, often conveying his emotions with just a few lines.
- Mouth: One of Luffy’s most defining features is his wide, toothy grin. Don’t forget to include those sharp canines!
- Body Proportions: Luffy’s body is lean but muscular, with exaggerated limbs that highlight his rubber abilities.
Tips for Capturing Luffy’s Essence
When drawing Luffy, it’s not enough to just copy his appearance. You need to capture his personality and energy. Here are a few tips to help you bring him to life:
- Focus on his expressions—Luffy’s emotions are often conveyed through his face, so pay attention to his eyebrows, eyes, and mouth.
- Experiment with different poses—Luffy is always on the move, so don’t be afraid to draw him in action.
- Don’t forget his signature gear—his straw hat, red vest, and blue shorts are essential to his identity.
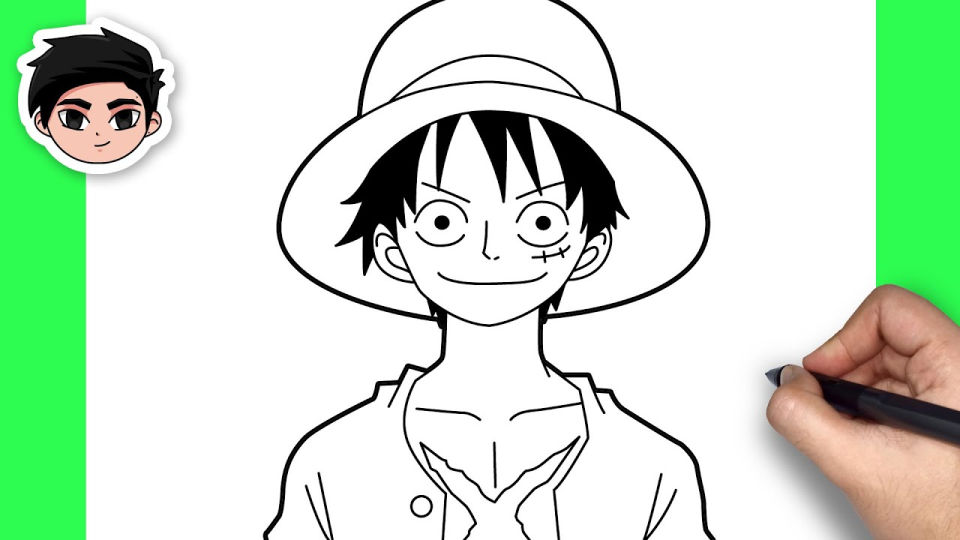
Step-by-Step Guide to Drawing Luffy
Now that we’ve covered the basics, let’s dive into the step-by-step process of drawing Luffy. This guide is designed for beginners, but even experienced artists can benefit from the tips and tricks we’ll share.
Step 1: Sketch the Basic Outline
Start by sketching a rough outline of Luffy’s head and body. Use light, loose strokes to create the basic shape of his head, neck, and shoulders. Remember, this is just a guide, so don’t worry about making it perfect at this stage.
Read also:Jaiden Fatu The Rising Star In The Wrestling World
Step 2: Add Facial Features
Once you have the basic outline, it’s time to add Luffy’s facial features. Start with his eyes, making sure they’re small and expressive. Then, draw his nose and mouth, focusing on that iconic toothy grin. Don’t forget to include his eyebrows, which often convey his emotions.
Step 3: Define the Head and Hair
Luffy’s hair is one of his most distinctive features, so take your time with this step. Sketch the shape of his hair, making sure it’s messy and spiky. Then, add his straw hat, positioning it slightly tilted to the side for a dynamic look.
Step 4: Draw the Body and Clothes
Now it’s time to move on to Luffy’s body. Sketch his torso, arms, and legs, paying attention to his exaggerated proportions. Then, add his signature red vest, blue shorts, and sandals. Don’t forget to include his belt and the scar on his chest!
Step 5: Add Details and Shading
The final step is to add details and shading to bring your drawing to life. Use cross-hatching or stippling to add depth and texture to Luffy’s clothes and hair. You can also experiment with different shading techniques to create a more dynamic look.
Common Mistakes to Avoid
Even the best artists make mistakes, but being aware of common pitfalls can help you improve your Luffy drawing skills. Here are a few things to watch out for:
- Proportion Issues: Luffy’s head and body proportions are crucial to his design. Make sure his head isn’t too big or too small compared to his body.
- Overcomplicating Features: Luffy’s design is simple, so don’t overcomplicate his facial features or clothing details.
- Ignoring His Personality: Luffy’s expressions and posture are key to capturing his essence. Don’t forget to convey his energy and enthusiasm in your drawing.
Advanced Techniques for Luffy Drawing
Once you’ve mastered the basics, you can start experimenting with advanced techniques to take your Luffy drawings to the next level. Here are a few ideas to try:
Experiment with Different Styles
While Luffy’s design is rooted in manga conventions, you can experiment with different art styles to give your drawings a unique twist. Try drawing him in a chibi style, a realistic style, or even a graffiti-inspired style.
Incorporate Action Poses
Luffy is always on the move, so don’t be afraid to draw him in action. Whether he’s stretching his arm to deliver a powerful punch or jumping into battle, action poses can add excitement and energy to your drawings.
Use Color to Enhance Your Art
Color can transform a simple sketch into a stunning piece of art. Experiment with different color palettes to bring out Luffy’s vibrant personality. You can use traditional coloring tools like markers and colored pencils or digital tools like Photoshop and Procreate.
Tools and Resources for Luffy Drawing
Having the right tools can make a big difference in your drawing experience. Here are a few recommendations to help you get started:
- Pencils: Start with a set of graphite pencils for sketching and shading. Mechanical pencils are also great for precision work.
- Eraser: A good eraser is essential for correcting mistakes and cleaning up your drawing.
- Paper: Use high-quality drawing paper for the best results. Sketchbooks are also a great option for practicing.
- Coloring Tools: Experiment with markers, colored pencils, and digital tools to add color to your drawings.
Online Resources for Learning
There are plenty of online resources available to help you improve your Luffy drawing skills. Check out tutorials on YouTube, join art communities on social media, and explore websites like DeviantArt and Pinterest for inspiration.
Conclusion: Your Journey to Becoming a Pirate Artist
Learning how to draw Luffy is more than just a fun activity—it’s a way to connect with the world of One Piece and express your creativity. By following the steps outlined in this guide, you’ll be able to create stunning drawings that capture Luffy’s essence and energy.
So, what are you waiting for? Grab your pencil and start drawing! And don’t forget to share your creations with the world. Whether it’s on social media or in person, showing off your art is a great way to inspire others and grow as an artist.
Until next time, keep drawing, keep dreaming, and keep chasing your dreams—just like Luffy!
Table of Contents